
How to Edit Your Free Company Page on BluePipes

As a professional networking service, BluePipes provides employers, including healthcare staffing agencies, with many free services for marketing and engaging with potential candidates. “Company Pages” are one such free feature. Given that BluePipes has over 10,000 members with hundreds joining every month, it’s a definitely worth it to spend some time making your company page look pretty. We’ll cover how to do that in this article.
BluePipes Company Page Benefits
BluePipes company pages have many benefits. Those benefits include:
- They’re FREE!
- Company Branding: We have over 10,000 members using our service to help them find jobs. Your page lets you expand your brand to these amazing candidates.
- Display your company phone number.
- Provide a link to your company website.
- Display details about your company’s service offerings.
- Receive messages/inquiries from BluePipes members.
Step 1: Associating with a Company Page
The first step in managing your BluePipes Company Page is to associate your profile with your company. To do so, you simply add your company as your current employer in your work history. If you’ve already added your company as your current employer in your work history, then you can move on to Step 2. Otherwise, follow these steps:
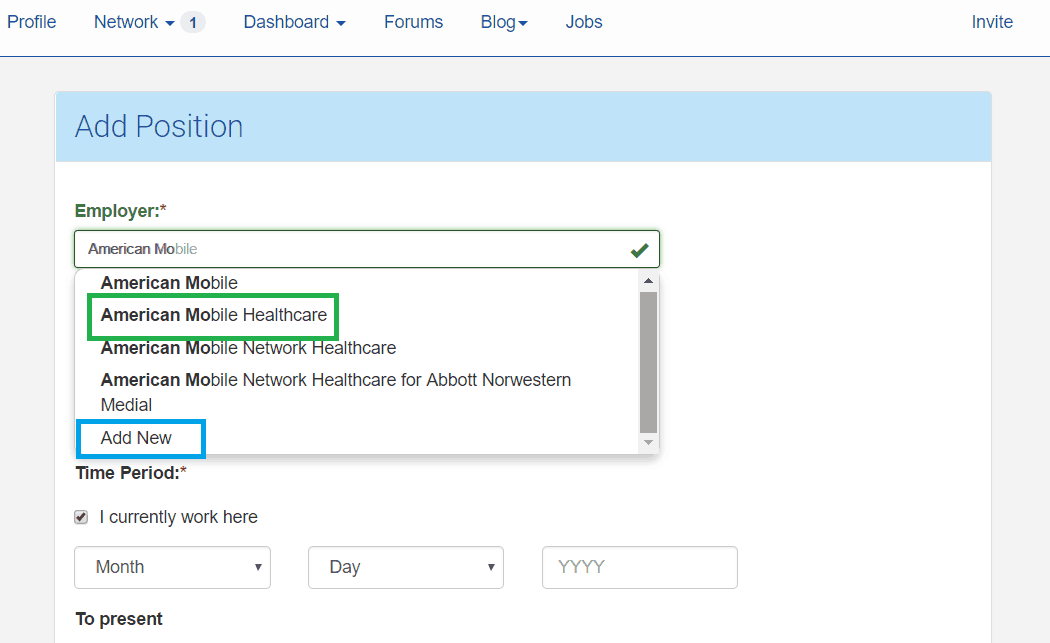
- Select “Add position” on your “Profile” page. Or select “Add Current Position” on the “DashBoard” page.
- Type the name of your company into the “Employer” field.
- Select your company from the dropdown menu if it’s already there.
- Select “Add New” if your company isn’t listed already.
- Save.
The image below illustrates:
When someone selects “Add New”, we automatically create a company page. We also add the company to the database so it shows up in the dropdown list for future users. When a user adds a company as their current employer, we associate the user with the company page as a “Connection”.
Step 2: Request to Claim or Join Your BluePipes Company Page
Once you’re associated with your company page, the next step is to “Claim” your company page or “Join” your company page if it has already been claimed by someone else. It’s important to note that only users who selected “Employer/Other” as their field when signing up for their BluePipes account are able to Claim or Join company pages. Follow these steps:
- Select “Dashboard” from the main menu.
- Under “Select a current company below to place a Claim or Join request.” select the company you want to Claim or Join
- Enter your email address in the window that opens and submit the form.
If you are placing a Claim request, then your request will come to BluePipes. We’ll approve the request or contact you with questions. If you are placing a Join request, then your request will be sent to the page Administrator. This is someone at your company who has already claimed the page. The page Admin will need to approve your Join request.
Step 3: Verify Your Email Address
You’ll receive an email notification letting you know when your Claim or Join request is approved. The email contains a link to verify your email address. Select that link to complete the process. Once complete, you’ll be listed as an “Employee” of the company.
Step 4: Edit Your Company Page
If you’re an Admin of the company page, then you’ll be able to edit it. Simply navigate to the company page and select “Edit Profile”. You can navigate to the company page by selecting the link to your company page on your own profile. You can also select “Dashboard” from the main menu, then select your company. This will take you to the Company Users page where you can select the name of the company in the Company Users menu to navigate to the company page.
Claiming and editing your BluePipes company page is free. It’s also free for BluePipes members to contact you through your company page. It’s a great way to expand your brand and recruit! Please contact us if you have any questions or problems getting things set up.

